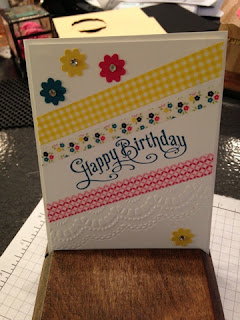
- Whisper White Cardstock (5.5"x8.5" & 4"x5.25")
- Daffodil Delight Cardstock
- Island Indigo Cardstock
- Melon Mambo Cardstock
- Island Indigo Classic Stampin' Pad
- Perfectly Penned Stamp Set
- Garden Gingham Washi Tape
- Delicate Designs (Doily Border) Embossing Folder
- Basic Rhinestones
- Dimensionals
- Natural Composition Specialty Paper (4-3/4"x12)
- Strawberry Slush Cardstock
- Very Vanilla Cardstock
- Soft Sued Classic Stampin' Pad
- Strawberry Slush Classic Stampin' Pad
- Baked Brown Sugar Ruffle Ribbon
- Card Base Pop 'n Cuts
- Dimensionals
I loved this when I saw it, it's a gift card/cash gift holder. I love finding new ways to use things that weren't their original purpose. It's so easy too!
Using the Simply Scored Tool, place the die cut piece (4-1/4"x11) with the flat end in the left corner and then score at are 1", 3-3/4" & 8-1/4".
I am in love! I know I have said this several times when something new comes out, but I am, again.
It is the new Label Card Thinlits Die. It looks pretty amazing as it is, right? But wait, there's more.....
- Cherry Cobbler Cardstock
- Whisper White Cardstock
- Silver Glimmer Paper
- Season of Style Designer Series Paper
- Tag It! Stamp Set
- Cherry Cobbler Classic Stampin' Pad
- Label Card Thinlits Die
When it's opened, the label part flips! It's awesome. What's even more awesome is the way you can make this card bigger than the die actually cuts.
When you use the full die as it is, it will cut a flat card 5-1/2"x6" and when it is folded it becomes 5-1/2"x4-1/4", which is great but I want a flap to cover what I'm writing so how do you do that? I'm glad you asked.
Start with a piece of cardstock 8-1/2"x5-7/16" (that's a smidgen under 5-1/2"). You want it to be slightly less than 5-1/2" so that you can slide the cardstock into the die and you have a "tail that sits on top of the die.
The beauty of this is that the place where the cardstock sits on top of the top creates a crease in just the right spot so you can fold it in towards the middle of the card and it hides anything you want to write on inside. Giving your card an element of surprise when it gets opened.
Thanks for stopping by and I hope I'll see you at the next Ladies Class in September.
--Marion


No comments:
Post a Comment
Thank you for leaving a comment. I will review and publish your comment within 24 hours. If you choose to leave a comment anonymously without a name or email I will not publish it. If I am unable to successfully contact you in response to your comment, it will not be published.